Install Windows 7 Operating System - Practical
COPA
Install Windows -7 Operating System
I have learned basically these steps to install windows operating system on Personal Computer(PC)
The three basic types of clean installation procedures are as follows:
- Install on a brand new disk or computer system
- Erase the disk, format it, and install
- Install into a new directory
I am using first two methods, be sure my computer can boot from a DVD (most newer computers support booting from a DVD drive).
Doing so might require changing the drive boot order in the BIOS or CMOS. The Windows 7 DVD is bootable and should run the Setup program automatically.
Clean Install from DVD, Step by Step
A typical clean installation (on a blank hard disk) step-by-step procedure is as follows:
1. Insert the Windows 7 DVD into your computer’s DVD-ROM drive, and restart the computer. Windows 7 Setup should start automatically. If Setup does not start automatically, ensure that your computer is configured to boot from the DVD drive.
2. In the next dialog box, you are prompted to start the installation. Click Install Now to begin the installation. This produces a screen that tells that Setup is starting.
3. In the Software License Terms dialog box, ensure that read and understand the End User Licensing Agreement (EULA). When you’re ready, select the I Accept the License Terms option and click Next to continue.
4. In the Which Type of Installation Do You Want? dialog box, shown in fig, we can select only the Custom (Advanced) option because you’re performing a new installation on a blank hard disk. Click Custom (Advanced) to continue.
5. In the Where Do You Want to Install Windows? dialog box, select the partition onto which you’ll install Windows 7. When we’re ready to proceed, click Next. If you need to provide a RAID or SCSI driver, now is the time to do it.
6. The Installing Windows dialog box appears and gives you an updated status of the upgrade process.
7. After some time, your computer restarts and the newly installed Windows 7 loads. Windows 7 resumes the installation process. Before the restart, a warning appears.
8. After the restart, we’ll see a notification telling you that Windows 7 is preparing the new installation. Windows 7 moves back into a graphical display after a few minutes and tells you it’s updating Registry settings and starting services, after which it lets you know it’s completing the installation.
9. After completing the installation, Windows 7 asks you to provide a username and a computer name. After providing this information, click Next to continue.
Note: Always choose a computer name that is unique. It must differ from any other computer, workgroup, or domain names on the network. You’ll probably want to enter your name or a name of your own choice, although Setup supplies a recommendation. You might want to coordinate naming your computer with your LAN administrator, if you have one.
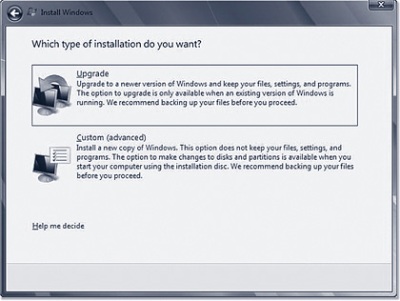
* Figure : For new installations, only the Custom (Advanced) option is available.
10. In the next dialog box, you are asked to supply a password for your user account (which you must reenter as a double-check) and a password hint to help you remember that string. After making your selections, click Next to continue.
11. In the Type Your Windows Product Key dialog box, enter the product key that came with your Windows 7 DVD. I recommend that you leave the Automatically Activate Windows When I’m Online option checked to take care of Windows Product Activation within the three days after the Windows 7 installation. After entering this information, click Next to continue.
we can also leave the Product Key box blank. If you do this, you’ll be asked which version of Windows 7 you want to install, and you can select any version from Starter to Ultimate. You’ll have to provide a valid product key, however, within 30 days for whatever version you install or else Windows 7 will nag you regularly and often about registration. (If you install a “slip-streamed” copy of Windows 7 Service Pack 1, or use the Windows Update service to upgrade to SP-1, you’ll be reminded to register rather than receiving constant nags.)
we can use the no-key method to play around with different versions of Windows 7, but be careful if you select a version for which you don’t have a key; you must perform a clean install every time you reinstall Windows 7, and you must eventually install a version for which you have a license, or erase it. You’ll lose your applications and data every time you reinstall.
Caution: You should definitely not play with alternate versions if you are upgrading from an older version of Windows. After the first such install, there’s no way to go back and repeat the upgrade with your licensed version of Windows 7.
13. In the Help Protect Your Computer and Improve Windows Automatically dialog box, you configure the base security for Windows 7. In most cases, you should select Use Recommended Settings. To make your selection, click it.
14. In the Review Your Time and Date Settings dialog box, select your time zone, daylight savings option, and current date options. Click Finish to complete the upgrade process.
15. In the Select Your Computer’s Current Location dialog box, shown in fig, tell Windows where you’ll be using your computer. As with Windows Vista, Windows 7 configures our network adapters for DHCP and does not ask you what to do.
16. Windows prompts you one last time-after you click Start, you’re finished with the installation.
17. After a few more minutes, you are finally presented with your brand new Windows 7 login screen, as shown in fig. Congratulations, we’ve completed the installation of Windows 7!